Step-by-Step Instructions for Installing Hardwood Floors
Here you can follow the Step by Step instructions for installing Hardwood Floors
Tools for Installing Hardwood Flooring
While the list of tools is minimal, and most people will already have many of the necessary items in their homeowner toolbox, there are a few specialty items that will be very handy.
Hammer
An ordinary hammer will be necessary—neither extra large nor very small. Just a hammer.
Saw
A circular saw of some kind will be needed. This can be either corded or the cordless variety of saw. Most cutting work will be in one area (hopefully outside), so a cordless circular saw will not offer a great advantage. A powered miter saw is very useful, but the job will require a large one to cut flooring material over 4″ wide, and while they are nice they are not required. Square cuts will likely be necessary in the flooring material for heating vents and such; a jig saw (sabre saw) would be very handy, but even a common hand saw can finish the work a circular saw has started.
Square
A speed square, framing square or combination square will be required. Even a plastic speed square will do fine.
Measuring tape
A measuring tape, preferably at least 25 feet long. A shorter tape will suffice, but do make sure it is at least as long as the room to be covered.
Pry Bar
A pry bar or crowbar is a must. One about 18″ long, with ends at least 1 1/2″ wide is far preferable.
Floor Installation Kit
Various floor installation kits are available. Most will include spacer blocks, hammering block and a special crowbar. The work done in this hub did not use such a kit, but spacer blocks and hammering blocks were cut from a scrap 2X4 and the special crowbar would have been nice. Consider purchasing such a kit—they are not expensive—and the crowbar in particular is very handy and will save considerable effort. If nothing else, the photos will provide a better idea for those readers unfamiliar with the terminology used.
Preparation for Installing a Hardwood Floor
There will always be a certain amount of preparatory work to any home improvement job, and it can vary when installing flooring.
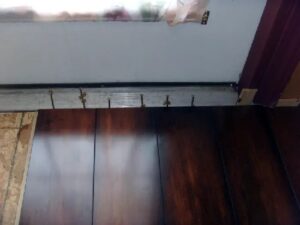
Common to all is the removal of any baseboard. The new flooring needs to go under the existing baseboard and/or shoe molding and this will require the removal of these items. Be very careful unless the intent is to replace these items as they will be re-installed after the flooring is installed.
The same is true for doorway jambs; the flooring needs to go under them. While they can be removed, it is usually easier to simply trim off the bottom ¾” or so (whatever is necessary for the new flooring) with a handsaw or oscillating tool. If you are installing a new door, make sure the door itself is high enough to clear the new flooring. In some cases both will be necessary as the flooring must be “tipped” into place and not slid horizontally on the floor; more on this later.
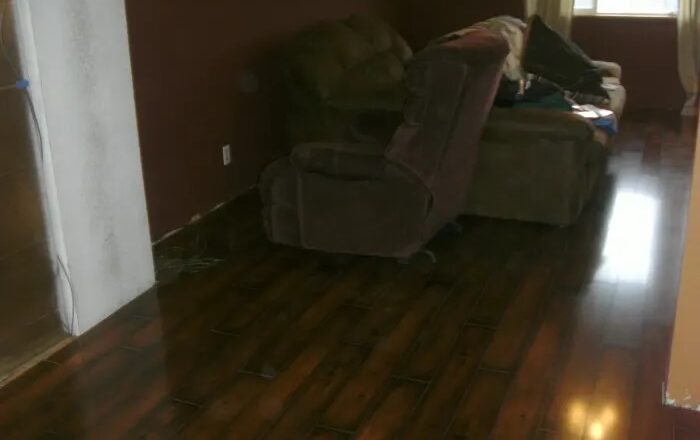
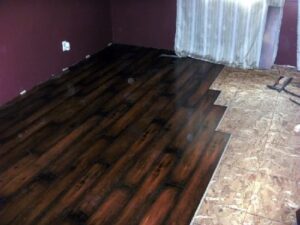
The subfloor must be in good condition, and while this does not mean a perfectly smooth, sanded subfloor, it does mean that any protruding nails or screws, any damaged areas or holes, any swelled places must all be repaired. The subfloor in the photos here was in very poor condition, and one area was simply missing where a chimney had passed through the floor at one time. The decision was to simply cover the entire floor with new subflooring, installed in appropriate thicknesses so the adjacent areas (where self-stick vinyl tile was to be installed) would have a matching finished height. The area of the old chimney had to be completely removed in a large area and all new flooring added, starting at the floor joists.
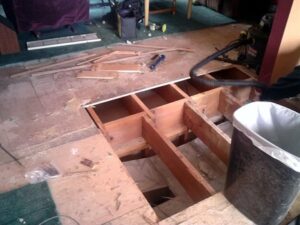
This subfloor was in very poor condition, and parts had to be replaced. The entire floor was then covered with a second layer.
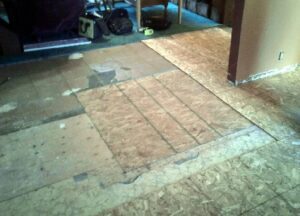
The replaced area is repaired and being covered again, along with the rest of the floor.
Laying Out the New Flooring
Begin by choosing the longest, straightest, wall; the planks will normally be placed along that wall as a starting point. Check that the opposite wall is reasonably square with it by measuring the distance wall to wall at each end. If the room is not square a judgement call will have to be made as to which wall (or both) will have planks cut that are narrower on one end than the other. Walls that are an inch or so out of square are not normally a problem, but if there is a wide variance between them starting and ending planks will have to be “ripped” (cut the long direction) at a small angle to accommodate the walls.
In our case, the walls were square enough, but there were too many of them. Two rooms were to have the new hardwood flooring installed; a dining room and a living room. Between the two was a wide opening, but no real doorway—just a wall that separated the two, but ended with an opening of some 8 feet between the two rooms. The two rooms shared a wall running the long direction, but in the center of it was a pair of heating ducts (to be covered in the future with built-in shelving) that the flooring had to go around. The other side of the dining room was kitchen cabinetry, with a walkway alongside the cabinet. The opposing “wall” in the living room was a stairway going down to a basement (split foyer style of home) that simply had a stair banister running along it. There was no real wall at all. The plan was to do the living and dining rooms, and in the near future continue the flooring into the hallway leading to bedrooms on the other side of the stairwell.
All of this gave one wall to start from, but 3 different widths; the dining cabinetry, the short wall separating dining from living, and the stairwell. The wall at the end of the hallway that would eventually be the end of the new flooring was ignored; whatever happens there will happen.
Each width needs to be considered, with the idea that you won’t want a plank only an inch wide as the last one to be laid against the “ending” wall. To figure this, measure the distance to the wall, deduct ½” (for a space at each wall, described later) and divide by the width of a single plank. The result will be a number of full planks (how many doesn’t really matter) and a partial plank. If that partial plank is less than ½ plank the first one laid must be ripped lengthwise to make the opposing “end” plank wider.
In our case the last plank would be only 2″ wide in the worst case (the stairwell) – the solution was to remove 1″ from the first plank all the way down the beginning wall. This resulted in a “last” plank of at least 3″ in each of our opposing “walls” and was acceptable. The first plank would be 4″ wide, with the three “last” planks (against the opposing “walls”) ranging from 3″ to about 4½” – were the last plank any wider there was a possibility that it would end up being just over a full plank as our planks were an odd width. Probably metric, but it made precise measurements difficult.
The next concern is the length of a plank at the end of a run; the beginning plank in each run is to be cut to different lengths so that the end joints don’t end up all in the same place. In the same manner as the width, the length of each run must be considered so that the last plank isn’t just a couple of inches long. In our case, we again had several measurements to consider; the length to the heating ducts, the length from the ducts to the far wall, the length from the beginning to the wall separating dining from living and the length from there to the opposing wall. In each case, it is necessary to measure the distance and cut that first plank in the run so that the final piece isn’t just a few inches long. Make the last piece at least 12″ long or even more, while maintaining the appearance of random lengths used as the first piece.
Our walls were reasonably parallel (only about an inch out along the stairwell) and we were able to use the first wall as a starting point, ripping each plank the same amount. If this won’t work for your room, you will need to draw a line along the floor (use a chalk line or even a string stretched the length of the room and tied to a temporary nail driven into the subfloor). Draw the line along the edge of where you need a plank to run. For that first plank all along the starting wall, measure the distance from the mark to the wall and transfer that mark to the plank. Repeat at the other end of the plank, draw a line the length of the plank between the two marks and cut the plank. Don’t forget to leave a ¼” space between the plank and the wall. The end result will be that the plank gets wider in one direction because the wall is crooked, but the finished, unsawn edge is straight in the room – it lines up with the chalk line on the floor you made.
A final consideration had to be made when we got to the banister along the stairwell; the post was in the center of a plank, and if a hole was cut in that plank the plank could not be put into place. Nor was the banister post removable; it was bolted from the underneath, inside a wall; the screws or lag bolts were not accessible. The solution was to cut the first plank in the run so that when the banister was reached there would be a joint where the banister post is; each of two planks, not just one, would have half the hole. By doing this it was possible to fit the flooring around the post with a little effort and although the hole is considerably larger than the post it will be covered with quarter-round trim.

Checking the length of that first run of planks from the heating duct to the far wall. However long the first piece is it must not result in a final piece that is only a few inches long.

This bannister post goes through the center of a plank; if a hole is cut for it in the middle of a plank it cannot be lowered into place.
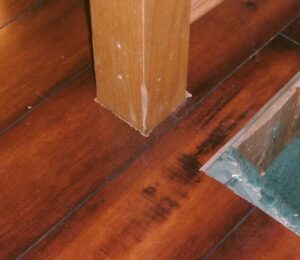
Blowup of the bannister; there are actually two planks, each with 1/2 of the hole for the bannister.
Installing the New Hardwood Floors
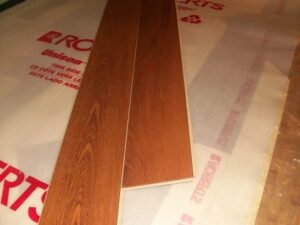
Before cutting or laying your first piece of the new floor, you have one final decision to make. Engineered hardwood flooring planks are manufactured with a tongue and groove on each side; they are designed to clip together by inserting a tongue into a groove with the planks at an angle to each other and then bending the second piece flat to the floor. In this manner they are very difficult to get apart (unless you tip one of them) and will hold together very well. The flooring we purchased was packaged and shipped as pairs of planks fastened together with that tongue and groove and stacked in a box; a little twisting and a light blow on the joint easily separated them but they had shipped hundreds or thousands of miles in that configuration.
Play with a couple of planks by laying one on the floor, flat, and tipping the second one into the first to snap them together. You will typically find that it is easier if the “right” one is on the floor and you slide the other one into the groove. If you reverse the planks, putting the second one on the floor while tipping the first one into it it will be more difficult. You need to decide which direction the planks will lay on the floor so that it is easier to add another plank. Typically, the plank with the longer tongue will go on the floor, with the long tongue away from the starting wall, but do play with a couple of planks to verify that your choice of flooring is also constructed that way.
With that decision made, put down any underlayment, following the directions that came with it. Make sure the proper side is up. All engineered flooring needs an underlayment, although some have a rubber backing already built into it and an additional layer is not needed – the flooring used for this job was of the type with a rubber backing. If the floor is over an unheated crawl space or concrete a vapor barrier should be used whether the flooring has the underlayment built in or not.
Putting Two Planks Together
Tipping one plank into another that is laid on the floor. Insert the second plank into the groove and “wiggle” it down flat to the floor.
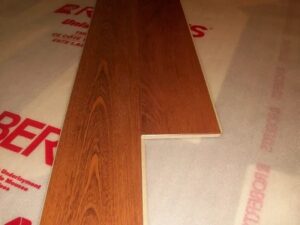
The two planks are now together and both flat.
Installing the First Row
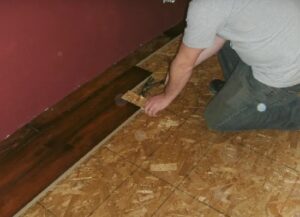
The first row along the first wall needs to be cut lengthwise to start; if nothing else to remove any tongue on the wall side. With the plank cut to the proper width the length needs cut as well; even if it is to be used full length it must at least have the tongue against the wall removed. The very first piece in any row needs a cut edge on one end against the starting wall and the appropriate groove on the other end. In our case, the planks were installed from left to right; a call was made how long to make the first plank in the row and a measurement taken from the right side of the plank for cutting. See the pictures for a better understanding of how this works. The piece that was cut off is not scrap and will probably be used on the far end of the row, so don’t discard or damage it.
For the very first piece of the floor, using the piece already cut to width, cut an appropriate starting length or use the full length piece. Lay it on the floor ¼” from the wall (there needs to be a ¼” space all the way around the flooring to allow for expansion and contraction). The second piece in the run will be inserted into the end of the first and will be full length, with a tongue or groove on each end as well as the side away from the wall. The second piece, as well as all other pieces against the starting wall, needs to be trimmed to the same width (unless the wall is crooked).
Put a ¼” spacer between the board and the wall at each end and periodically along the entire wall, perhaps 2 per plank. If you purchased a kit it should have spacers; if not cut some from a scrap piece of lumber. Very few walls are absolutely straight – the wallboard goes in and out to some degree – so pick places for the spacers appropriately.
Continue laying full length pieces to the far wall. The last piece will need to be cut to length; be sure to measure from the finished surface and not the tongue to find the length of the final piece. Remember as well to make that last piece ¼” short to maintain spacing to the wall.
With the first row down, it is a good idea to drill small holes in the flooring next to the wall and drive finishing nails through the flooring and into the subflooring. Do not drive the nails flat with the flooring; they will be removed later. If this is done, make sure that they are close enough to the wall that the baseboard or other molding will cover the holes left when they are removed. The purpose of these nails is to hold the flooring in place while additional pieces are added and thus only a couple of nails per plank is needed. The flooring will move about very easily and it can be difficult to keep it still while more is added.
Take some time with this row and get it right. The right place, planks fitted completely together, the proper spacing to the wall; everything. It will be what determines the appearance of the final job. When the floor in the photos was done the first couple of rows took over two hours; the entire rest of the job, with all the cuts included, took only about 5 more.
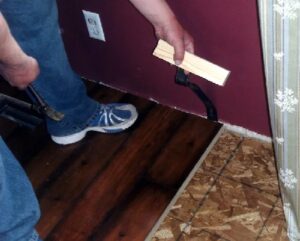
Cutting the First Piece of a Row to Length
This is one piece that has been cut; it is lying in the orientation that it will be installed. The first piece will be the short end; it has a cut surface to the left that will fit against the threshold to the left.
The two pieces have exchanged places; the left piece goes against the threshold, many more additional full length pieces fit between them, and the right piece against the wall far to the right. The right hand end will eventually be trimmed to fit.
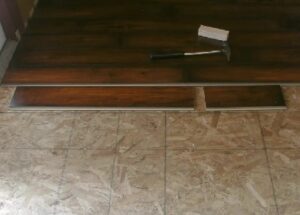
Installing the Flooring
The first row installed, up to the heating ducts projecting into the floor area. The final bit will be covered by shelving.
Driving the piece sideways with a wood block. The piece of subflooring did not work well; it quickly came apart leaving wood scraps everywhere. A 2X4 block was much better.
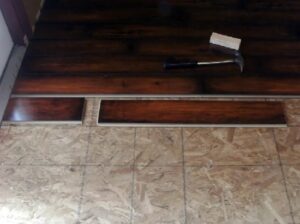
Prying the last piece sideways into the end of the preceding piece. The special crowbar in an installation kit would be nice here.
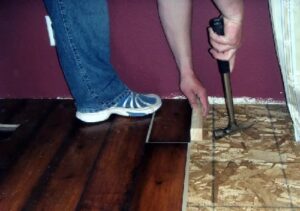
Driving the last piece in the other direction.
Adding Ddditional Rows
With the first row down the work will proceed much faster now. Pick a length for the first plank in the second row, but make sure it doesn’t result in a very short plank on the far end. For instance, if you already know that a full length first plank will make the last piece 12″ long, don’t cut the first piece to be 11″. It will result in the last piece being only an inch long and will look very odd. Try to make each piece at least a foot long. Cut the first planks in such a manner as to make it appear that it is random by varying the lengths considerably. A good method is to lay the plank on the floor where it will go, look at where nearby joints in the preceding 3 or 4 rows are, and grab the one to be cut where it won’t line up with other joints. Don’t mark it; just take it and cut it about where your hand is. This results in cuts that will almost never line up exactly, yet aren’t close to the row next to it, either.
The first plank of the second row simply needs inserted into the existing floor, but the rest aren’t quite so easy. You cannot tip the plank two directions at once, but instead must insert the long side first, with the plank as close to the proper place as possible. It is then be driven sideways with a hammer and block. Place the block at the end of the plank, being very careful not to damage any protruding tongue, and tap it sideways with the hammer as shown in the photo. If possible, have someone stand on existing planks as a new one is driven into it to hold the floor in place. This operation of driving planks together with a hammer can move any already placed flooring very easily and is why the finishing nails and ¼” spacers were used in the first row, but whether or not nails were used check frequently that the already laid flooring isn’t coming apart at seams or moving. Driving planks into place can sometimes pull joints apart some distance away from the work is going on.
The last piece in the row can be difficult. If an installation kit was purchased it will include a bar that can be hooked over the end of that last piece and hammered sideways but otherwise a crowbar must be used to pry against the wall to fit the pieces together. Be careful not to damage the wall; you may find that there is no support behind the sheetrock and simply push the crowbar right through it. A block behind the crowbar is advisable.
It is also possible to drive the last piece the other direction; fit the ends together and drive it back into the existing floor instead of sideways. For small pieces this works well, but long pieces will require considerable finesse to be successful.
Wall Spacers Along the Flooring
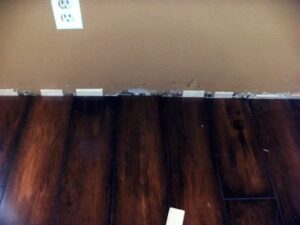
Spacers inserted at the end of each board.
This section is in front of french doors, so nails were driven just outside the flooring into the subfloor to maintain the spacing. Eventually a custom made transition piece will be made to go from flooring to threshold.
The Final Row
The last row can sometimes be a little difficult as well. Part of our final row was against cabinetry which gave no support for a pry bar. Part of it was against a built up tile floor where we wanted no gap at all, and a part of it was over the stairwell that was not square with the rest of the room.
In the case of our cabinetry, it was a short wall, only around 10 feet, and we were able to assemble the final 3 pieces of flooring end to end and put it in as one unit. This helped considerably as there was no last piece in the row to drive in. Although difficult to fit into the groove tightly, a little wiggling and pushing did the trick without too much trouble.
At the tile, it was not possible to match the width exactly; the tile had not been cut with a straight edge and even a 1/16″ is very visible. We didn’t end up with that much gap, but it is still visible. If the owners decide that it is objectionable or the surface of the laminate begins to peel, a transition piece will be added to cover the gap. These are often available to match the flooring in appearance, generic wood ones can be purchased, or steel transitions in either silver or gold color.
The stairwell simply required a little more time as each piece had to be completely measured and cut individually; each one was a little different. Instead of baseboard (impossible as there is no wall) the area will be covered with 1X2 boards stained to match the flooring as trim.
The entire floor took 3 people about 7 hours to do from start to finish. There were some minor problems – only 2 hammers for 3 people, no finishing nails and furniture that had to be moved from side to side in the room as the flooring went down. They were all minor irritations and inconveniences, however, and the work went fairly smoothly. The total amount of hardwood flooring installed was about 500 square feet. That we had 2 rooms, with multiple widths and the duct work to work around complicated matters somewhat and took a little more time; a simple square room would have gone some quicker.
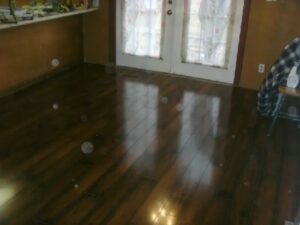
Finished Project
Several rows, waiting for the end piece to be cut.

Leave a Comment